Serialized LOB

We moesten een object aanpassing maken. De property waarin nu één waarde zit, moest meerdere waardes gaan bevatten.
Als je zoals ik ben gebrainwasht met dit boek tijdens je studie (Data base systemen voor de praktijk, Prof. Dr. J.A. Vandenbulcke) grijp je meteen naar normalisatie, een 1 op N relatie moet het in de database zijn!
Dit keer echter, in overleg met een ongeveer even oude collega, hebben we het juk van dit ‘moeten’ van ons afgegooid en gekozen voor het opslaan van de lijst met meerdere waardes, gewoon in 1 veld.
En het werkt eigenlijk best prettig: een property met daarin de lijst met items (serialized naar JSON) en op de class een paar methodes om de lijst te onderhouden.
Deze property, die voorheen gewoon publiek schrijfbaar was, wordt nu dus onderhouden met methodes als ‘VoegItemToeAanLijst(item)’ en ‘BestaatItemInLijst(item)’ en ‘VewijderItemUitLijst(item)’.
Deze oplossing blijkt echter al best lang te bestaan: een kleine 10 jaar na brainwash heeft Martin Fowler dit al beschreven in de ‘Serialized LOB’: “saves a graph of objects by serializing them into a single large object (LOB), which it stores in a database field.”.

Kleine drawback:
In het kader van information hiding zou deze property nu dus private moeten zijn, zodat deze niet van buiten de class kan worden gewijzigd.
Helaas is het in de Entity Framework versie voor de 4.8 versie van .NET geen fatsoenlijke oplossing beschikbaar dat een property voor de aanroepende code private is, maar voor Entity Framework wel gebruikt kan worden om van- en naar de database te gaan.

How to run the JavaScript unit tests from Visual Studio.

In my previous post How to set up JavaScript testing in Visual Studio 2017 with Jasmine and Karma I created a Visual Studio 2017 suite for running JavaScript unit tests.

In that post I started the process of running the tests on the command prompt. There is also a way to start them from Visual Studio itself.
You can do that with the help of a taskrunner named Gulp.
Gulp is a tool you have to install; I’ll do that with the help of NPM.

Run this command in the directory your karma.conf.js file is located:


Npm install -g gulp --save


Now add to your project, at the same level as the karma.conf.js file, a new JavaScript file named gulpfile.js.

(I’m not sure why it must be called gulpfile.js or that it is completely mandatory to do so, but when I renamed the file it didn’t work anymore).

Then add the following content to this file:


var gulp = require('gulp');

var Server = require('karma').Server;

gulp.task('start-javascript-unit-testing', function (done) {
 new Server({
 configFile: __dirname + '/karma.conf.js',
 singleRun: false
 }, done).start();
});

This will create a gulp-task with the name  start-javascript-unit-testing.

This task will start a Karma server and then wait for changes in your (test-)code (like specified in the karma.conf.js file.

You will then also see this task in your task runner:

task-runner-explorer

If you don’t have the task runner visible, use [view] [other windows] [task runner explorer] to show it.

If you double-click the task start-javascript-unit-testing a small window will be opened and the first run of tests will start.

task-runner-explorer-start-1

Then, when you change the (test-)code the tests get re-executed for direct feedback.

task-runner-explorer-start-2

Happy unit testing!

In the install of gulp, I used the -g switch which installs the package globally.

The NPM docs say “If you want to use a package as a command line tool, then install it globally. This way, it works no matter which directory is current. This is the choice you would use if you were installing grunt, for example.”; and grunt is sort of gulp.

But when I wanted to use the (globally installed) gulp in another project, I did have to install it local to that project too:


Npm install gulp --save

How to set up JavaScript testing in Visual Studio 2017 with Jasmine and Karma

At my current project I wanted to start testing my JavaScript code. However, there was no JavaScript testing code yet, so I had to set it up.
Should be no problem, I have done it before (ok, only once).
As with anything you only do once in a while (on most existing projects the setup is already done), you tend to forget the details.
So for you, and for me too: how to set up JavaScript testing in Visual Studio 2017 with Jasmine and Karma (in my case for testing plain JavaScript and KnockoutJS).

When all goes well, you have to take these steps:

  1. Create a test project (in your Visual Studio solution)
  2. Install Karma and Jasmine
  3. Configure the Karma runner
  4. Create tests
  5. Start the testrunner
  6. Enjoy

This of course is the happy flow; I’ll also talk about the little thing besides the happy flow I encountered.
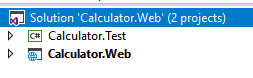
I will show you this tutorial with this project:
initial-web-project-visual-studio

This is a web solution which is an online calculator:
calculator-website-screenshot
It consists of one HTML file and one JavaScript file which looks like this:

var Calculator = new function () {
    this.add= function (number1, number2) {
        return parseInt(number1) + parseInt(number2);
    };
}


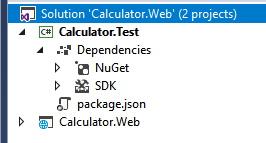
1 Create a test project

I’ll add a unittest-project; a project of type ‘Unit Test Project (.NET core)’.
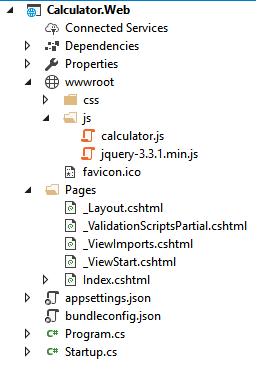
The solution now looks like this:
webproject-with-testproject

2 Install Karma en Jasmine

If you are comfortable installing packages via NPM or you use another package manager, then just install these packages and go to step 3.

  • jasmine
  • karma
  • karma-jasmine
  • karma-chrome-launcher

If not, read on:
I use NPM as package manager. Visual Studio used to have a favor for Bower for client side packages, but I think NPM is more mainstream.
NPM stands for Node Package Manager and is, as you might guess, part of Node(JS). NPM is widely used for installing (client side) packages.
Check first if NPM works on your machine: open up a command window (with administrator privileges) and type ‘npm’ and enter.
If you get something like this
git-in-command-prompt
NPM is available and you can go to step 2b: install the packages.

If you get a message that NPM is not a valid command (‘npm’ is not recognized as an internal or external command, operable program or batch file.), read on:
NodeJS can be installed as a separate install, but when you installed Visual Studio with the webtooling option, you will probably already have a copy installed. That is because Visual Studio does it’s own install of NodeJS. It’s not very visible it does, and where it is located.
At my computer it’s located at
C:\Program Files (x86)\Microsoft Visual Studio\2017\Professional\Web\External\
As you can see the version of Visual Studio (professional) is in the path, so your location might differ. If you can’t find the path, just search for ‘npm.cmd’ on your machine.
If you can’t find it, you don’t have a NodeJS install and you should download and install it first from the offical nodeJS site , and then locate the ‘npm.cmd’ file.
Easiest thing to do is to add the location of the ‘npm.cmd’ file to your windows path, otherwise you have to always specify the full path when you run an npm command.

2b: install the packages.

So at this point you can run ‘npm’ in a command window.
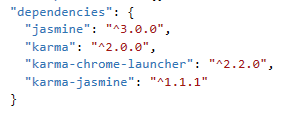
Add, to your testproject, a NPM packages file. This will hold the names of all the NPM packages you will install:
add-new-item-packagesjson

solution-with-packages-json
Then go, in the still open command window, to the root directory of the testproject. This is the directory where the ‘package.json’ file is located.
In my case this is ‘C:\projects\git\Calculator\Calculator.Web\Calculator.Test’.
Then run, one by one, these commands

  • npm install –save jasmin
  • npm install –save karma
  • npm install –save karma-jasmine
  • npm install –save karma-chrome-launcher

I got some warnings and deprecated messages during this process, but it did not seem to break anything.
The ‘–save’ options makes NPM save the package to the earlier created ‘package.json’ file.
dependencies
The ‘NPM install’ command creates a lot of folders (401 in my case) in a, also newly created, folder named ‘node_modules’.
You don’t have to include these in your project or sourcecontrol.
When I ran the commands in a second project, it somehow installed Jasmin version ‘0.0.2’, which is not ok. So after running ‘npm install –save jasmin’ check the ‘package.json’ file. If it says ‘”jasmin”: “0.0.2”‘ then replace it with ‘”jasmine”: “^3.0.0″‘ and run ‘npm install’ (without any parameters) and the correct version will be installed.

3. Configure the Karma runner

Karma will take care of running your tests, but for that it needs some information.
In the still open command windows (and still in the root of the testproject), run
‘node node_modules/karma/bin/karma init’.
This will ask some questions, answer them like this below.
karma-init
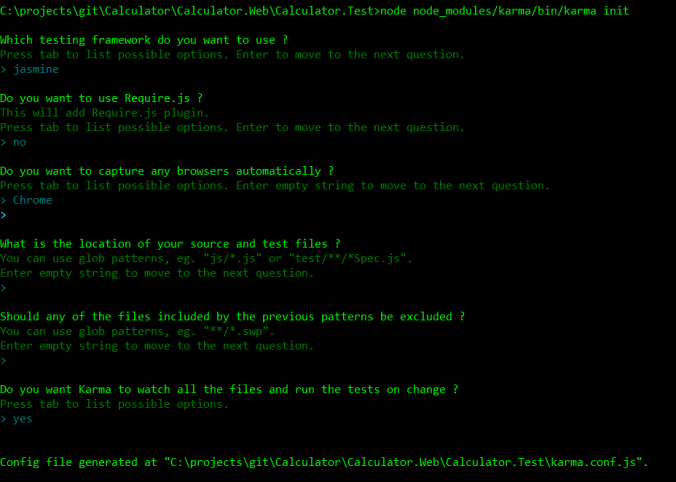
In this example the location of the source and test files is left blank; we will enter them later.
Because we installed the Karma Chrome runner, we choose ‘Chrome’ (case sensitive) for the browser.
When you are done a file ‘karma.conf.js’ is created; include it in the project.

4. Create tests

Time to create the first test.
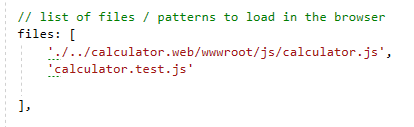
In the ‘karma.conf.js’ we will add the paths to the sourcecode files as well as the files containing the tests. You edit the ‘files’ node and type the links to the files, all relative to the ‘karma.conf.js’ file.
If your source code is dependent on other files or 3rd library source files like KnockoutJS or JQuery, you will have to include the paths to those files here too.
In my solution I added  ‘./../calculator.web/wwwroot/js/calculator.js’ to point to the sourcefile and ‘calculator.test.js’ to point to the testfile (which I will create next)
files

Add a JavaScript file to your project, in my case it is called ‘calculator.test.js’
The content of the test is Jasmine specific (more info about Jasmine here) but it basically holds a description and the test (in ‘expect’).
It reads like this:

describe('calculator', function () {
    it('13 add to 16 should return 29', function () {
        expect(Calculator.add(13,16)).toBe(18);
    });
});

And now your first test is complete!

5. Start the testrunner

Run the following command in the still open command window:
‘node node_modules/karma/bin/karma start .\karma.conf.js’
This will run the tests (one at this time) and opens a (Chrome) browser.
If you add more tests and files and therefor edit the ‘karma.conf.js’file to include those files in the ‘files’ section, you have to stop the process and restart it in order to reload the ‘karma.conf.js’ file.

Now your test failed!
failing-test

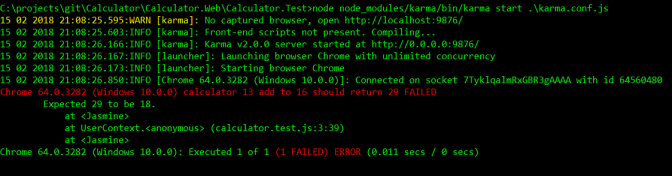
That is because there is an error in the test.
Now change the ’18’ to ’29’ in the ‘calculator.test.js’ file and save the file.
The test is rerun automatically and should succeed now.
passing-test

6. Enjoy

Your first test now succeeded, celebrate it and head on for more tests!

What’s left to do for me is the following (which when I am done will create an article for too):

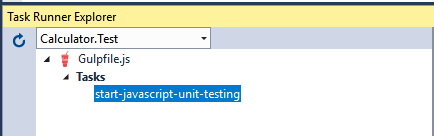
  • Run tests in Task Runner Explorer so I don’t have to run the command in the command prompt.
    Check. Created a post here How to run the JavaScript unit tests from Visual Studio.
  • Write tests in TypeScript
  • Test a TypeScript file (in stead of testing generated JavaScript)
  • Run the tests in Visual Studio as part of MS-Test

Azure pricing for Cosmos DB at Q4 2017

Azure pricing frequently puzzles me. “What parameters affect the pricing?”, “This is a cheap amount, is that real?”, “What can I expect as ‘normal’ use?” etc.
In the (not only interesting for the pricing subject) presentation from Pascal Naber at the TechDays 2017 (in Dutch) I saw an excellent slide about Azure Cosmos DB pricing:

Azure pricing for Cosmos DB at Q4 2017

What you can see the Cosmos DB pricing consists of 2 parts:
The first one is the size of your storage (in GB), is in the right column and probably makes most sense.
The second, in the left column, is the pricing for the number of RU’s per second you reserve ahead of time. And this needs more clarification.
A ‘RU’ means a ‘request unit’ and Microsoft calls defines it as “the measure of throughput in Azure Cosmos DB” (at the end of this article you will find a more verbose definition).
Now this is quite an abstract term: “a measure of throughput”, and that’s the reason I found this slide so valuable: it has some examples.
So here you can see a 1KB read is 1 RU, a 1KB write is 5 RU and a ‘select group by’ is 70 RU.
The numbers higher than one are probably estimates and will depend on request and response size but at least it gives you something to start with.

This slide is from October 2017 so the exact numbers and prices will probably vary with the time you read this.

The more verbose description of the RU by Microsoft:
A request unit (RU) is the measure of throughput in Azure Cosmos DB. A 1-RU throughput corresponds to the throughput of the GET of a 1-KB document. Every operation in Azure Cosmos DB, including reads, writes, SQL queries, and stored procedure executions, has a deterministic RU value that’s based on the throughput required to complete the operation. Instead of thinking about CPU, IO, and memory and how they each affect your application throughput, you can think in terms of a single RU measure.

Moving affinno.nl to HTTPS

I’ve been planning to move my business site affinno.nl to https for quite a long time now, and last week I finally made the move.

I requested a https certificate for my site from my hosting provider and after payment my site was https!

Of course there were some things to do on my site too, like replacing all the links to https (don’t forget the sitemap.xml) and setting up my local environment to be https ready.

Setting up my local environment for https was one thing that scared me but turned out to be really simple: create a personal certificate in IIS and use that for your site.

I found a great post by Max Vasilyev / Trailmax which shows all actions to take when moving to https: https://tech.trailmax.info/2014/02/implemnting-https-everywhere-in-asp-net-mvc-application/

So go to https://www.affinno.nl (or to http://www.affinno.nl – you will be redirected automatically) and you’ll be safe 😉

Secure_HTTPS_image

Different TypeScript function notations

In our project we use 2 different notations for defining functions in the Typescript files.In our project we use 2 different notations for defining functions in the Typescript files.One I call the ‘simple notation’ and the other one the ‘lambda notation’ (because it looks like the Lambda notation in C#).

private simpleMethodA(data: NavigationParameters): void { 

    this.doSomething(data);

}
private lambdaMethodA = (data: NavigationParameters): void => {

    this.doSomething(data);

} 

I always wondered what the difference was. It turned out it makes a difference in the JavaScript that is generated:

MenuViewmodel.prototype.simpleMethodA = function (data) {

    this.doSomething(data);

};

 this.lambdaMethodA = function (data) {

    _this.doSomething(data); 

}; 

(in this method, the _this is declared like “var _this = this;” in the viewmodel).

So the simple notation is generated as prototype method and the Lambda method is generated as method on the viewmodel.

Estimating the work of creating an email newsletter

I was asked to estimate the work to create an email newsletter. The work of reading email addresses and sending the mail was already in place, so all I had to do was create the HTML.
I received some visual guidance and most of the content was already present in text), so all I had to do is create one static HTML page, how hard could it be?

Boy was I wrong.

Ok, so the first HTML file I’ve sent was ok…. on my Gmail account.
…On my Office365 account it looked almost ok.
…On the Microsoft mail it looked ok’ish.
…On the MAC of the boss it looked not ok.
…On the email reader of the modern Android phone, it looked quite good, on the older Android phone, it looked like abstract art.
…On the IPhone it looked somewhat ok.
…And so on…

As webdeveloper I am used to browsers sometime implementing things different than other browsers.
But with the email newsletter the dark side of the (IE vs Netscape) past came back to live for me. Not only was it almost not possible to work CSS only so I had to fall back to the type a lot, but the differences of visualization of the HTML were surprising… and not in a good way.
This obvioulsy lead to investigating the topic more than I expected to do!

Free Microsoft Virtual machines to test software on Microsoft Edge and Internet Explorer 8 through Internet Explorer 11

So I was looking for a quick way to test my website on an older version of Internet Explorer.
And when I searched for free virtual environments I thought “Maybe searching for free Windows images is not such a good idea; I might end up at some weird place on the internet“.
But much to my surprise there actually are virtual machines to test software on Microsoft Edge and Internet Explorer 8 through Internet Explorer 11, issued by Microsoft itself.
They have a limited livespan of 90 days but for some testing this will do. And otherwise you can download a new one after this period.
You can download images for these browsers:

  • IE8 on Win7
  • IE9 on Win7
  • IE10 on Win7
  • IE11 on Win7
  • IE11 on Win81
  • Microsoft Edge on Win 10

Then, you can choose from these image formats:

  • VirtualBox
  • Vagrant
  • HyperV (Windows)
  • VPC (Windows)
  • VMware (Windows, Mac)
  • Parallels (Mac)

So whatever preference you may have, there is a download for you.

I am working with the IE11 on Win7 HyperV image, and it works like a charm.

You can download them  here:

https://developer.microsoft.com/en-us/microsoft-edge/tools/vms/

Windows 10 quick screenshot / printscreen

Do you quickly want to create a screenshot / printscreen of your entire screen in Windows 10?
Press [windows key] [ printscreen] at the same time, that’s all there is to it.

keyboard windows printscreen 2

Press [windows key] [ printscreen] at the same time and your screen turns gray’ish for a split-second, and a screenshot is automatically saved in your default pictures folder, in the subfolder ‘Screenshots’.

screenshotfolder

Using Fullcalendar

I was looking for a calendar to use in an admin portal, to show exceptions on a given day.
So I decided to give FullCalendar (http://fullcalendar.io/) a try, and boy did it work out nice.

It took 4 steps:

  1. Create an HTML element where the calendar should be placed
  2. create the data
  3. create a little script to configure
  4. last, in my case, add a click handler to the day element to drill into the data.

So first, the HTML element:

<div id="calendar"></div>

Then step 2: the data.

My data comes from a database, and I select the following data:

{
    "id": "2016-05-02",
    "title": "119 errors",
    "start": "2016-05-02",
    "allDay": true,
    "className": "exceptionPurple"
  },
  {
    "id": "2016-05-03",
    "title": "21 errors",
    "start": "2016-05-03",
    "allDay": true,
    "className": "exceptionRed"
  },

The id is when I want to drill in on the data. I only show how many errors there are on a given day, and (see below) I hook a click event to the calendar to get all errors for a specific day, and I use the id of the event to see which day is selected.

The title holds the number of errors.

The start is the date in which the event is placed. It’s about the number of errors in a day, so it doesn’t have a start- or end time, but I set ‘allDay‘ to true.

The at the end I set the className. This (css) class is applied to the element in the calendar. In my case red means 10-20 exceptions that day, and purple 21-50. I also use other colors for no errors, 1, 2-5, 6-10, 51-100 and 100 or more.

Step 3 and 4, configure it.

This is were normally a lot of time and Googling is spent, but this one is really easy.

$(document).ready(function () {

$('#calendar').fullCalendar({
	events: '/exception/getexceptions',
	eventClick: function(calEvent, jsEvent, view) {
		toonlog(calEvent.id);
	},
	height: 700,
	//the element title contains html which gets escaped. This line sets the html content
	eventRender: function (event, element) {
		element.find('span.fc-title').html(element.find('span.fc-title').text());
	}
	});
});
function toonlog(eventId) {
	$.get('/exception/getexception/?dateinput=' + eventId, function (data) {
		$("#logcontent").html(data);
	});
}

First line in a jQuery load event, call the fullCalendar function on the element we created in step 1.
events property: this is the url of the api where the JSON (in step 2) is returned. The start- and enddate of the period is automatically sent along to this url as querystring parameters.
eventClick: the function that gets called when a user clicks on the event
eventRender: a function to use when there is html in the title (in the JSON)
function toonlog: the function which get called when the user clicks an event. This function goes to the server, gets all exceptiondata and returns it. The function then puts it in an HTML element called #logcontent.

(the toonlog functionality is left outside the scope of this article, but what it does is call to the /exception/getexception method on the server which then returns all the exceptiondata on a given day).

And then, when we add the css for all the colors

.exceptionRed {
	background-color: red;
	cursor: pointer;
}

.exceptionOrange {
	background-color: orange;
	cursor: pointer;
}
.exceptionBlack {
	background-color: black;
	color: white;
	cursor: pointer;
}
//other ones left out

this is the result (the today, next-month and previous-month buttons are automatically added):

fullcalendar